

How to Edit the Resolution of a Picture Without Losing Quality

It is impossible to find a place without images nowadays. If you need to upload a photo of the product you are selling in an online store, post pictures in social networks, design a website, or prepare images for printing – proper image resolution is the key element of a successful project. Good-quality images will make your web resource more professional, while improperly sized pictures will be blurry, pixelated, or won’t be uploaded at all. People have already faced such an error like “picture too big” without knowing how to deal with this issue.

That’s why it is necessary to know how to change the resolution of a picture for photographers, designers, bloggers, students, and entrepreneurs. Changing an image’s resolution does not always imply reducing its quality. When the right methods are applied, it is possible to resize an image, reduce its size and preserve the high quality of the picture.

One more popular issue that people face is how to make small pictures without losing their quality. Thanks to new technologies, it has become easier to resize images nowadays. Proper image resolution changer helps to make an image smaller without reducing its quality.

What Is Image Resolution?

The resolution of an image can be defined as the level of detail in the digital image. Each digital image is composed of very small squares known as pixels. It is the total number of pixels that define the resolution of the image.

For instance, an image of 4000 × 3000 pixels resolution contains many details as compared to an image of 800 × 600 pixels resolution. This means that high resolution is used for printing purposes and large screens whereas lower resolutions are better used online as they load quickly.

Most of the beginner users think that resolution and file size mean the same thing but actually, there is a difference between the two. This is the very first thing that needs to be understood in order to edit image resolution properly.

Resolution vs File Size

Though these two terms are used together frequently, they actually represent different things about an image.

The term “resolution” means the dimensions of the image in terms of pixels. File size, on the other hand, means the amount of storage space the image takes up.

For example, two images could both have the same resolution of 1920 × 1080 pixels. However, one could be in JPEG format while the other is in PNG format, causing the PNG file to be larger in file size since it uses less compression.

Other factors that affect file size include:

  • The image format
  • Compression level
  • Color information
  • Embedded metadata

This is why reducing file size doesn’t always require lowering the image resolution. Sometimes changing the image format alone can significantly reduce the file size.

Why Image Resolution Matters

Apart from aesthetics, the resolution of images is a performance factor. An image with high resolution offers a lot of detail and is good to use for posters, brochures, and marketing. But that same image would be too big for a website, slowing down its performance.

Choosing the correct resolution helps you:

  • Improve website loading speed.
  • Upload images without “picture too big” errors.
  • Save storage space.
  • Maintain image quality across different devices.
  • Create professional-looking content.

Whether you’re managing an online store or simply sharing family photos, understanding image resolution helps you achieve the best possible results.

Why You May Need to Change an Image Resolution

There are many situations where changing image resolution becomes necessary. Sometimes you need a smaller file for uploading, while other times you need a larger image for printing or professional editing.

Let’s look at some of the most common reasons.

Your Picture Is Too Big

Some of the major factors that prompt a user to look up ways to resize an image are upload limitations. There are some sites where there is a certain limit of file size that you can upload. Even if the image seems to be fine with your settings, it might not upload due to its size.

This problem is common on:

  • Online application forms
  • Government portals
  • eCommerce marketplaces
  • Email attachments
  • Social media platforms

Instead of taking a new photo, you can simply resize the existing image. Reducing its dimensions or compressing the file usually solves the problem while keeping the image visually appealing.

You Want to Make Small Pictures

Resizing images for webpages, presentations, and mobile phones is yet another popular cause.

The ability to make small images involves not only decreasing the size but ensuring high-quality images at the same time.

With modern software, you have the possibility of making your picture smaller while retaining its details, thus making it considerably lighter. That will definitely come handy for blogging and websites as small images will increase speed.

Moreover, when posting images on social media, making them smaller will help them be displayed properly across all the screens.

Better Website Performance

Website speed has become one of the most important ranking factors in search engine optimization. Large images often slow down websites, especially on mobile devices.

Optimized images offer several advantages:

  • They load much faster.
  • They improve the user experience.
  • They reduce bandwidth usage.
  • They support better SEO performance.
  • They help improve Core Web Vitals.

Because of these benefits, many businesses use a resolution changer before uploading images to their websites. Optimized images not only make websites faster but also create a more professional experience for visitors.

Understanding DPI, PPI, and Pixels

When researching how to edit the resolution of a picture, you’ll often come across terms like DPI, PPI, and pixels. These terms are related, but they aren’t interchangeable.

Pixels

Pixels are the tiniest pieces used to create an image on computers and smartphones. All the images that we see have thousands or even millions of pixels in them. The higher the number of pixels in an image, the clearer it is.

PPI (Pixels Per Inch)

PPI measures how many pixels appear within one inch of a digital display. A higher PPI generally results in sharper-looking images on screens.

DPI (Dots Per Inch)

The DPI is mostly related to printing and represents the quantity of dots of ink that a printer uses per inch of paper. Although the DPI value does not affect the image on the computer screen, it defines the quality of the printed image.

Having the knowledge of these concepts makes it much easier to select the appropriate values when working with images.

Choosing the Right Resolution for Different Uses

Not all images need to have the maximum resolution possible. Different situations call for different optimal resolutions.

For instance, if an online shop needs product photos that will allow customers to examine products thoroughly by zooming into them, then high resolution will do well. However, when writing a blog post, the goal is to have optimized images that will load fast and at the same time retain good quality.

This is because social media sites automatically resize the uploaded images, which means that uploading very high resolution images will not yield much fruit.

How to Edit the Resolution of a Picture

Resolution of a Picture

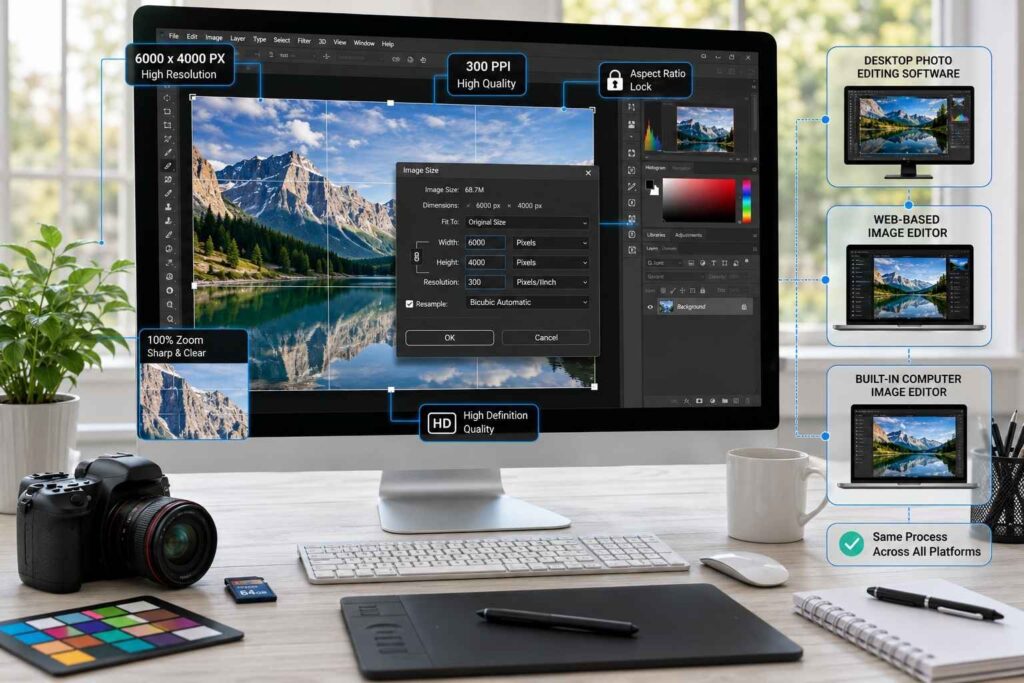
Now that you have knowledge about the concept of image resolution and its importance, let’s understand the method of editing the image resolution properly. Editing image resolution might be easy, but incorrect editing of image resolution might lower the quality of the image. Therefore, it becomes important for you to know about the editing process.

It doesn’t matter whether you use any kind of photo editing software, web based image editor, or even built-in image editor on your computer; everything will be the same way.

Check the Current Image Resolution

The first step is to check your image’s current dimensions and file size. Most editing software displays this information in the Image Size, Properties, or Resize section.

Before making any changes, ask yourself a few simple questions:

  • Where will this image be used?
  • Does it need to be printed?
  • Is it only for a website or social media?
  • Is the file too large to upload?

These questions help you decide whether you should reduce the resolution, compress the image, or simply change the file format.

For example, if you’re uploading a product image to an eCommerce website, you may not need a photo that’s 5000 pixels wide. Reducing it to a suitable size can improve website performance without affecting image quality.

Choose the Right Image Dimensions

After knowing the placement of the image, choose the right dimensions according to the requirement.

The most common error made by beginners is changing the dimensions of the image while not taking into account the aspect ratio of the image. It makes the image look distorted and stretched.

Most software comes with a feature that helps users lock the aspect ratio automatically. Having this feature on means that when one changes the width of the image, the height will automatically be changed proportionately.

In the case of making small pictures, reducing both the width and height can work well.

Select the Best File Format

After resizing, choose the right image format before saving.

Each format serves a different purpose.

  • JPEG is ideal for photographs because it balances image quality and file size.
  • PNG is suitable for graphics, logos, and images with transparent backgrounds.
  • WebP is one of the best choices for websites because it provides excellent quality while keeping file sizes small.
  • TIFF is mainly used for professional printing and editing because it preserves maximum image quality.

Choosing the correct format can significantly reduce file size without changing the image resolution.

How to Change Resolution of Image Without Losing Quality

A lot of individuals fear that adjusting the image resolution will make the image blurry. The good news is that this is not always the case.

In cases where one is shrinking the size of the image, the chances are high that there will be no quality problems since today’s software employs sophisticated methods of resizing images. However, the problem arises when you want to increase the size of the image.

Start with the Highest Quality Image

It is always best to edit the original image wherever possible.

Editing a compressed image again and again will eventually degrade the quality of that image. Having the original image will help to make versions out of one image.

Resize Only Once

Instead of resizing an image multiple times, decide the final dimensions first. Every unnecessary edit increases the chance of losing quality, especially when working with JPEG images.

Use Moderate Compression

Compression helps reduce file size, but excessive compression introduces visible artifacts and reduces sharpness. A balanced compression level gives you a much smaller file while keeping the image looking clean.

Avoid Enlarging Small Images

This is probably the most prevalent mistake.

For instance, even if an image has been resized from 600 × 400 to 4000 × 3000 pixels, that does not mean more information will be generated. Instead, the program will merely add additional pixels, resulting in a blurred image.

On occasions where a larger image is needed, it may work better to use AI-powered upscaling technology.

What Is a Resolution Changer?

A resolution changer is any program or website that can help in changing the size or resolution of an image. Some of the tools may be designed to downsize images only, while others have additional features including AI upsizing, sharpening, cropping, and compressing.

A good resolution changer should allow you to:

  • Resize images without stretching them.
  • Maintain the original aspect ratio.
  • Reduce file size without noticeable quality loss.
  • Export images in multiple formats.
  • Preview changes before saving.

Whether you’re editing a single image or hundreds of product photos, using the right tool can save a significant amount of time.

Common Mistakes to Avoid While Resizing Images

Even experienced users occasionally make mistakes while editing images. Understanding these common errors can help you avoid unnecessary quality loss.

Ignoring the Aspect Ratio

Changing only the width or only the height causes distortion.

People may appear wider or taller than they actually are, and objects can lose their natural proportions.

Always keep the aspect ratio locked while resizing.

Using the Wrong File Format

Storing photographs in PNG format results in an unnecessary increase in file size. In a similar way, storing graphics with text as compressed JPEG results in blurry edges. Use the appropriate file format based on how you intend to use the image.

Saving the Same JPEG Multiple Times

Every time a JPEG image is edited and saved, compression slightly reduces image quality.

Instead of repeatedly editing the same file, keep an original copy and export new versions whenever required.

Increasing Resolution Too Much

Increasing image dimensions doesn’t create new details.

If the original image is low quality, enlarging it significantly usually produces soft edges and visible pixels.

Optimize Images for Better SEO

If you own a website or blog, optimizing images isn’t just about appearance it also affects search engine rankings.

Google considers page speed as an important ranking factor, and oversized images are one of the most common reasons websites load slowly.

Before uploading an image, consider these simple optimization tips:

  • Resize the image according to your website’s layout.
  • Compress the image without reducing visual quality.
  • Use descriptive file names.
  • Add relevant alt text.
  • Choose modern formats like WebP whenever possible.

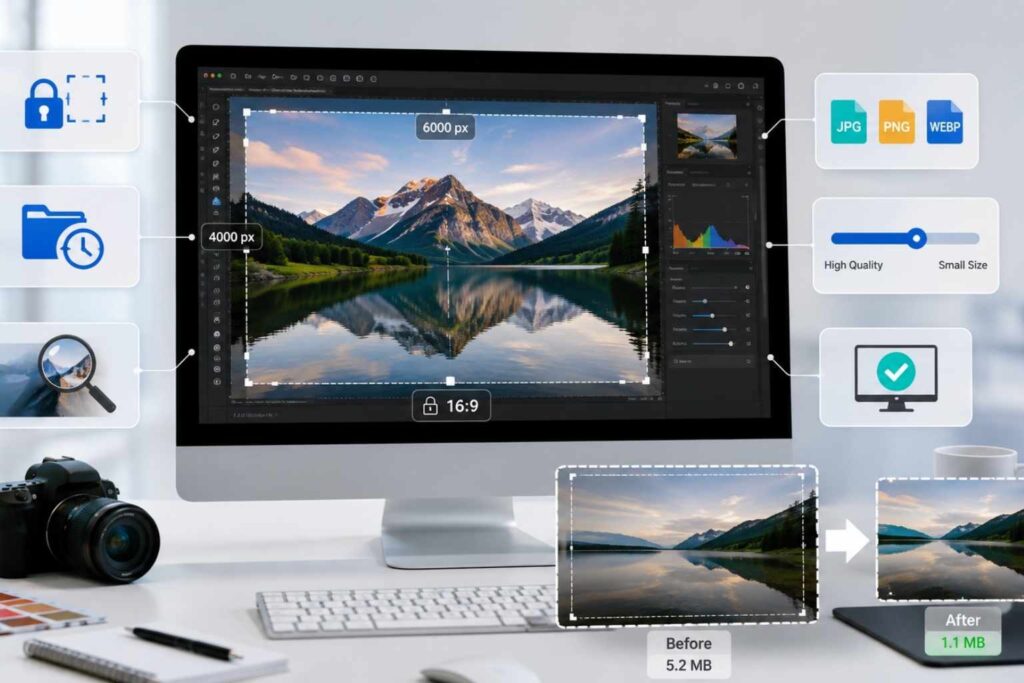
Another useful practice is cropping unnecessary areas before resizing. Removing empty backgrounds or unwanted objects often reduces file size while improving composition.

If you want to learn more about cropping images correctly before resizing them, read our complete guide here:

This guide explains how cropping and resizing work together to create cleaner, faster-loading, and more professional-looking images.

When Should You Increase Image Resolution?

Although downscaling is more prevalent, there are occasions when upscaling can work well.

For instance, if you are creating an image for print purposes, having a bit of extra resolution will be helpful. Nevertheless, upscaling to an excessively large size will not have a beneficial effect on the quality of the initial file. Rather than merely upsizing your picture, use modern AI-enhanced technologies to enlarge it without losing clarity and sharpness.

Best Practices to Maintain Image Quality

Image Quality

However, changes in resolution do not necessarily translate to loss of quality in all cases. In fact, when done correctly, one can change image size without affecting the quality or professionalism of the image.

In case of any changes on an image, make sure to have a copy of the original image for future use.

Some simple practices can help you get better results:

  • Keep the aspect ratio locked while resizing.
  • Avoid increasing a small image too much.
  • Use the right file format according to your requirement.
  • Compress images carefully to balance quality and file size.
  • Preview the image before uploading or publishing.

If an image contains unnecessary areas, cropping it before resizing can also improve the final result. Removing unwanted portions helps reduce file size and keeps the main subject focused.

Conclusion

Knowing how to change the resolution of a photo means that you will be able to deal with photos better for websites, social media sites, print-outs, and even on the Internet. No matter whether you need to solve the problem of big photos, learn how to create small photos, or use a resolution changer the right setting matters.

The main point is that you should resize your images depending on their destination.

Crop Image & Resize Photos Like a Pro (Easy Guide)

Why Image Cropping and Resizing Matter ?

The image is now one of the key aspects of digital communication. When you create your blog, run an online store, post on social media, or publish videos on YouTube, the appearance of your images may affect their engagement.

Creating a great image goes beyond taking a picture. The editing process, including cropping and resizing, may significantly improve the image quality, its composition, and usability.

Acquiring skills of proper image file cropping allows you to get rid of unwanted spaces, crop the picture in a better way, and emphasize the most interesting part of it. At the same time, applying a picture resize calculator makes it possible for you to change the image dimensions while keeping the proportions and quality intact.

When it comes to YouTube channels and digital marketing, there is no problem without a YouTube image resizer.

There are plenty of users who upload images without paying attention to their size, aspect ratio, and the needs of the particular platform. It results in blurriness of visuals, improper formatting, slow loading of web pages, and a bad user experience.

What Does It Mean to Crop an Image?

Understanding the Concept of Image Cropping

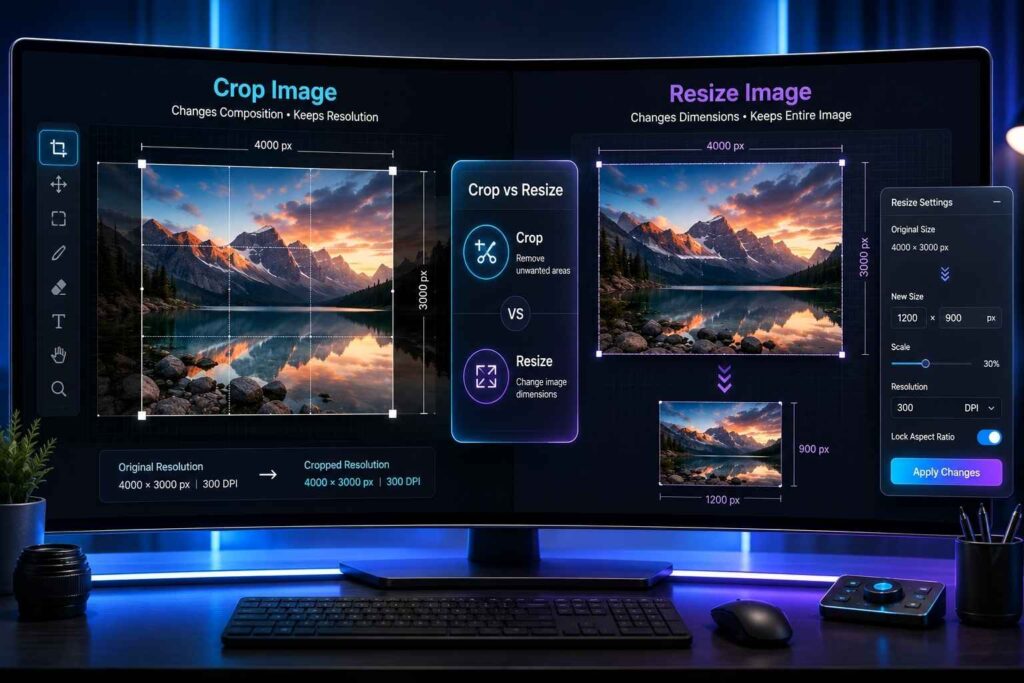
Image cropping is the act of eliminating parts of the image that aren’t necessary and leaving only the parts needed on the picture. Cropping alters the composition of an image and guides the viewer’s eye to focus on the key subjects.

In other words, cropping can be described as editing the photograph’s composition right after it was taken. The actual content of the picture does not change; all you do is select the needed parts of the photograph.

For instance, a portrait photograph can have too many spaces between the figure and the borders of the photograph. With the help of cropping, those unnecessary parts will be eliminated.

Cropping is widely used by:

  • Photographers to improve composition
  • Businesses to prepare product images
  • Designers for marketing materials
  • Bloggers for website visuals
  • Content creators for social media

A simple crop can completely transform an ordinary photograph into a more professional-looking image.

Why Is It Important to Crop Image Files Properly?

Improves Image Composition

Composition is one of the major reasons why professionals edit pictures by cropping them. Composition means how things are arranged inside the frame.

A picture might have a great subject but have many empty areas or distracting features. A good crop will provide for the balance and allow the eyes of the viewer to move to the most important parts of the picture.

Professionals usually add extra space in their pictures when shooting because they are aware that they will be able to adjust the composition later on during post-processing.

Removes Unwanted Distractions

Even carefully captured photographs can contain unwanted elements that reduce their impact.

A background object, random person, or unnecessary empty area can make an image look less professional. Using an image cropper allows you to remove these distractions and create a cleaner visual experience.

Common distractions include:

  • Unwanted background objects
  • Excess empty space
  • Random people
  • Visual clutter

By removing unnecessary elements, the main subject becomes more noticeable.

Helps Images Fit Different Platforms

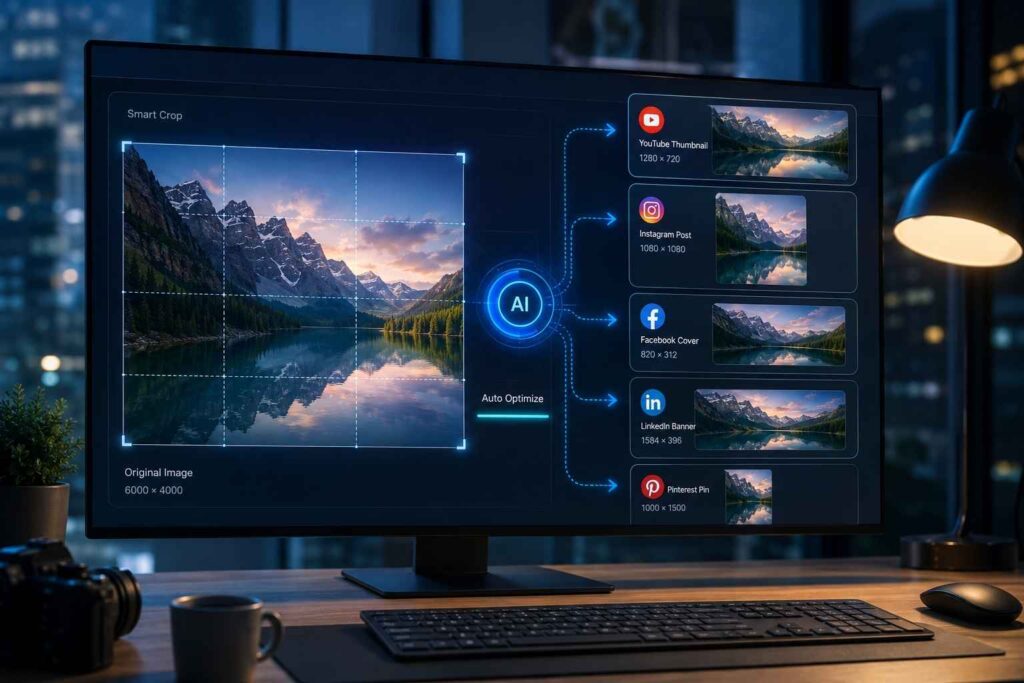
All platforms have their own image specifications. The picture that is appropriate for one website can look distorted on Instagram, Facebook, or YouTube.

Using cropping, you are able to tailor your image for different uses without taking the trouble to create separate pictures.

Thus, while one image may be good for a web banner due to its width, the other one may serve as a square-cropped image on social media. Consequently, cropping is an indispensable element of today’s digital content generation.

Crop Image vs Resize Image: Understanding the Difference

Crop Image vs Resize Image

What Happens When You Crop an Image?

In cropping, the unnecessary parts in the picture’s borders are trimmed off. The contents that are left unchanged will have a different composition.

As an illustration, when a product photograph has excessive background near the product itself, the cropping process eliminates the extra space and highlights the product.

What Happens When You Resize an Image?

Resizing changes the width and height of the entire image without removing any part of it.

For example, a website may require an image size of 1200 × 630 pixels. Resizing allows you to adjust the image dimensions to match those requirements. Although cropping and resizing are different processes, they are often used together.

A professional workflow usually involves:

  • Cropping the image to improve framing
  • Resizing it according to platform requirements
  • Optimizing the final image for better performance

This approach creates high-quality visuals without unnecessary quality loss.

Common Uses of Image Cropping

Product Photography

Online enterprises rely greatly on product images since there is no way for customers to inspect the products prior to purchasing.

This will help businesses maintain consistency in their product images by centering the products and eliminating extraneous background from the pictures.

It makes the product image look professional.

Social Media Content

Social media platforms display images in specific formats. Incorrectly sized images may cut off important details or appear unprofessional.

Creators use cropping to prepare images for:

  • Instagram posts
  • Facebook graphics
  • LinkedIn banners
  • Pinterest content
  • YouTube thumbnails

A properly cropped image ensures important details remain visible.

Website and Blog Images

Websites often require images with specific dimensions for banners, featured images, and article sections. Cropping helps create visuals that fit perfectly into website layouts while maintaining a professional appearance.

What Is a Picture Resize Calculator?

Understanding Image Resize Calculators

Picture Resize Calculator is a special program designed to help calculate the correct image size during the process of image resizing.

It often happens that users manually adjust the image size by altering both width and height, which causes image distortion and gives a natural-looking picture an unnatural appearance.

However, using a resize calculator allows one to calculate the correct image size without distorting the initial proportions.

For instance, if the user decreases the image width, the program automatically finds out what the new height of the picture.

Benefits of Using a Picture Resize Calculator

Maintains Proper Image Quality

Incorrect resizing can make images appear stretched, compressed, or blurry. A picture resize calculator helps maintain proper proportions, ensuring that images continue to look natural after resizing.

Saves Time During Editing

Calculating dimensions manually can be confusing, especially when handling multiple images.

A resize calculator provides accurate measurements instantly, helping designers, marketers, and content creators complete editing tasks more efficiently.

Creates Platform-Ready Images

Different platforms require different image dimensions.

Using a resize calculator helps prepare images for:

  • Websites
  • Online stores
  • Social media platforms
  • Presentations
  • Video thumbnails

Understanding Image Dimensions and Aspect Ratio

What Are Image Dimensions?

Image dimensions refer to the height and width of an image in terms of pixels. For instance, an image with dimensions 1920 x 1080 consists of 1920 pixels across the horizontal axis and 1080 pixels across the vertical axis. Larger dimensions will give you more information, although they’ll also lead to larger file sizes.

Why Aspect Ratio Matters

The aspect ratio is the ratio of the image’s width to its height. Observing the right aspect ratio helps to ensure that there is no distortion of the image. YouTube thumbnails, for instance, need to be wide images, while profile images should mostly be squares.A good picture resize calculator will help one achieve the right aspect ratio when resizing the image.

What Is a YouTube Image Resizer?

Preparing Images for YouTube Content

A YouTube image resizer is a tool that adjusts images according to YouTube’s recommended dimensions.

Creators use these tools to prepare:

  • Video thumbnails
  • Channel banners
  • Profile images
  • Promotional graphics

A properly resized image remains clear and professional across desktops, tablets, and mobile devices.

Why YouTube Image Size Matters

A thumbnail is often the first thing viewers notice before deciding whether to watch a video.

A poor-quality thumbnail may appear blurry, incorrectly cropped, or difficult to understand. This can reduce viewer interest.

Using a YouTube image resizer helps creators maintain:

  • Clear visuals
  • Readable text
  • Professional branding
  • Consistent appearance

A well-prepared thumbnail creates a stronger first impression and improves the overall quality of a YouTube channel.

How to Crop and Resize Images Like a Professional

Follow the Right Editing Process

Creating a professional-looking image requires more than simply changing its size. The order in which you edit your image can affect the final quality. A proper workflow helps maintain clarity while making sure the image fits its intended purpose.

The first step is understanding where the image will be used. A YouTube thumbnail, website banner, product image, and social media post all require different dimensions and compositions.

Before resizing, it is usually better to crop image areas that do not contribute to the main subject. Once the composition is improved, you can resize the image according to the required dimensions.

This process prevents unnecessary quality loss and ensures that your final image looks natural.

Step-by-Step Process to Crop Image and Resize Photos

Step 1: Choose the Main Focus of the Image

Before making any changes, identify the most important element in your photo.

Ask yourself:

  • What should viewers notice first?
  • Which part of the image communicates the main message?
  • Are there any unnecessary areas that distract from the subject?

For example, in product photography, the product should always remain the center of attention. In portrait photography, the person’s face and expression should be the primary focus.

A clear understanding of the subject helps you create better crops.

Step 2: Remove Unnecessary Areas

After you have identified the central theme, trim the surrounding areas from it. A proper crop removes extraneous elements without leaving the photo looking incomplete. Don’t crop anything that is integral to your picture like faces, product outlines, or necessary background information.

The aim is not only to reduce the size of the photo. It is to improve the photo. Professional editors regularly apply the crop feature to achieve a visual hierarchy whereby the viewer’s attention is drawn to the most important element.

Step 3: Maintain the Correct Aspect Ratio

After the crop process, choose the right aspect ratio depending on the place where the image will be posted.

The platforms present images in different ways. Choosing the wrong aspect ratio could lead to automatic cropping, distorted visuals, or loss of key information. For instance, a YouTube thumbnail needs a wider aspect ratio while social media profiles need square aspect ratios. One can use a picture resize calculator to get the exact measurement.

Step 4: Resize Without Losing Quality

Once the cropping is done, scale the picture depending on your needs. Do not scale up a small picture to a very large one, since that will lead to blurring. It is always better to begin with a higher resolution picture wherever possible.

When scaling up, remember to keep the aspect ratio the same. Altering the dimensions independently will give the picture an unnatural appearance. There are modern techniques for automatically maintaining the ratio while scaling.

Best Practices for Maintaining Image Quality

Start With a High-Resolution Image

The final output is very dependent on the quality of the initial image.

An image that has high resolution will give you the ability to crop and resize easily since it will not become pixelated when some parts are removed.

High-quality images are stored by professional photographers and companies while others are created for various purposes.

Avoid Excessive Cropping

Even though cropping enhances composition, excessive cropping of images may lead to poor quality of images.

When you crop a small image extensively, the number of pixels available for presenting the subject in that image will be low, leading to a blurred image, especially when viewed in a large screen size.

Use the Correct File Format

The file format also affects image quality and performance.

Common formats include:

  • JPEG: Suitable for photographs because it provides good quality with smaller file sizes.
  • PNG: Useful for graphics, transparent backgrounds, and images containing text.
  • WebP: A modern format that provides excellent quality with smaller file sizes, making it useful for websites.

Choosing the right format ensures your images remain sharp while loading efficiently.

Common Image Cropping Mistakes to Avoid

Cropping Too Close to the Subject

Another frequently made error is taking away too much room around the subject. Although a tight crop can be an effective way of adding impact, it can also give an unpleasant and incomplete feeling. When taking portraits, do not crop the picture too tightly around key areas such as the face, shoulders, or hands unless you want a tight crop. With product photos, leave sufficient room around the product for ease of viewing.

Ignoring Mobile Display

While many tend to optimize their photos for desktops alone, a majority of users access content using mobile devices.

An image that appears well on a computer may appear distorted when viewed on a mobile phone. Ensure that your image is appropriate for all types of screen sizes.

Using the Wrong Image Dimensions

Large file sizes for the pictures might slow down the website, while using small file sizes can make the pictures look bad.

This is where the image resizing calculator comes in handy to calculate the perfect dimensions of the image before you upload it.

How a YouTube Image Resizer Helps Content Creators

Creating Better YouTube Thumbnails

YouTube thumbnails are one of the most important factors influencing clicks. Before watching a video, viewers usually see the thumbnail first.

A properly designed thumbnail should be:

  • Clear and easy to understand
  • High quality
  • Visually attractive
  • Properly sized for all devices

A YouTube image resizer helps creators prepare thumbnails that maintain sharpness and correct proportions.

When important elements such as faces, text, or products remain visible, viewers can quickly understand the video’s topic.

Improving Channel Branding

Consistency is a vital part of creating a distinct YouTube channel.

People who apply the same styles of images, dimensions, and layout are able to develop their brand better.

A YouTube image resizer tool allows for keeping the sizes of thumbnails, banners, and other channel pictures consistent.This will help create a more professional appearance.

Image Cropping and SEO: How Optimized Images Help Websites

Better Website Performance

Optimization of images is an essential part of website optimization. The use of large images that have not been optimized increases loading time, resulting in poor user experience. Images that are properly cropped and resized have reduced file size without losing quality. Fast-loading websites lead to better visitor experience and are key in search engine optimization.

Improved User Experience

Visitors prefer websites that are visually appealing and easy to navigate.

Well-sized images fit naturally within website layouts and prevent issues such as:

  • Slow-loading pages
  • Broken layouts
  • Blurry visuals
  • Poor mobile experience

Using optimized images creates a smoother browsing experience.

Better Image Search Visibility

Search engines use image information to understand visual content.

To improve image SEO, businesses should focus on:

  • Descriptive image file names
  • Relevant alt text
  • Proper dimensions
  • Optimized file sizes

A correctly cropped and resized image provides better context and improves accessibility.

Choosing the Right Image Resizing and Cropping Tool

Features to Look For

The best editing tool depends on your requirements, but a reliable tool should provide accurate results and an easy workflow.

Important features include:

  • Simple interface
  • Multiple size options
  • Aspect ratio control
  • High-quality output
  • Fast processing
  • Support for common image formats

For beginners, an easy-to-use tool with automatic calculations is often the best choice.

For professionals, advanced controls and batch editing features can save time when managing large numbers of images.

Future of Image Cropping and Resizing Technology

AI-Powered Image Editing

Image editing is becoming faster and smarter with artificial intelligence.

Modern tools can automatically detect subjects, suggest better compositions, and recommend ideal crops.

AI-based features can help users:

  • Identify important objects
  • Automatically adjust framing
  • Resize images for multiple platforms
  • Improve image quality

These technologies make professional editing accessible even for beginners.

Automatic Platform Optimization

Automatic Platform Optimization

Future image editing applications will be increasingly integrated with digital platforms. Users no longer need to manually select image dimensions; they only need to select where they want to post their image, and the application will automatically format the image. For instance, by choosing “YouTube thumbnail” or “Instagram post,” the application will automatically provide the right image dimensions and cropping.

Final Thoughts

It is very important to know how to crop images and adjust their size in today’s world of digital images. As a photographer, businessman, marketer, blogger, or YouTube content creator, using properly optimized images will allow you to be more effective in your work.

With cropping, you’ll remove all unnecessary parts of an image and highlight important elements. Resizing allows you to create perfect images that will fit all platforms well.

There are many tools that can be used for the process, like a picture resize calculator, which helps keep correct proportions. For example, YouTube image resizer will allow you to create high-quality thumbnails for your channel.

In order to have success with your image editing, it is not enough just to make your images smaller or change its dimensions. You need to create good-looking, high-quality visuals for your viewers.

Crop Image Like a Pro: The Complete Guide for Beginners

The role of images in online communication cannot be overestimated. From publishing photos in social networks, setting up a website for online shopping, or posting blog material, you should take care of the quality of your visual content.

Continue reading Crop Image Like a Pro: The Complete Guide for Beginners
How to Make a Collage on Photoshop: A Complete Beginner’s Guide

Photo collage is an interesting idea that involves using several photos to create one design. It may be used for vacation photo presentations or any other reason, such as making a gift for someone on a special occasion or creating content for your social media page.

Continue reading How to Make a Collage on Photoshop: A Complete Beginner’s Guide
Merge Photos in Seconds: Easy App Guide for Beginners

As we have already come in the age of digitization, visual content has become one of the most influential kinds of communication. From social media to e-commerce websites, from digital marketing to your memories; everything consists of pictures now.

Continue reading Merge Photos in Seconds: Easy App Guide for Beginners
Album Collage Creator: Complete Guide to Modern Visual Design (2026)

An album collage maker is an innovative digital application that allows users to merge various photos and present them as a structured image. In the digital age, visual content is the strongest means of conveying information.

Continue reading Album Collage Creator: Complete Guide to Modern Visual Design (2026)
20 Picture Collages, 30 Photo Collages & 30 Picture Collage Ideas That Look Stunning

There is nothing more effective and impressive than making photo collages to keep memories safe. You should not keep your photos randomly in albums or other devices. A photo collage combines all the photos in one single design, telling a whole story.

Continue reading 20 Picture Collages, 30 Photo Collages & 30 Picture Collage Ideas That Look Stunning
Print Photo Collage: The Ultimate Guide to Turning Memories into Beautiful Wall Art

Any photograph has something to tell. But a set of photographs tells the whole story. Be it holidays, weddings, birthday parties, or regular gatherings, photography helps us keep memories that may be forgotten with time passing by.

Continue reading Print Photo Collage: The Ultimate Guide to Turning Memories into Beautiful Wall Art
How to Get Rid of White Background on Image: The Complete Guide to Cleaner, Professional Photos

In the case of creating product listings, marketing materials, or web images, there is no need to use white backgrounds all the time. Although such elements are popular among photographers and designers, they limit further applications of pictures because of their inability to change a setting easily.

Continue reading How to Get Rid of White Background on Image: The Complete Guide to Cleaner, Professional Photos