

There are many tools for image manipulation and improvement. However, one of the most popular tools for working with images is Photoshop.
Millions of people across the world use Photoshop to produce high-quality images regardless of whether they are professional photographers or just online shoppers. The process of resizing an image is very popular among Photoshop users.In order to create social media posts, optimize website graphics, print photos or upload product images, it is important to know how to properly resize images in Photoshop. It happens frequently that beginner Photoshop users change dimensions of an image without taking into consideration how it influences its resolution. There can be some reasons for changing the image size on Photoshop. For example, sometimes an image can be too big for a website or any other place where it should be posted. On the other hand, you may need to enlarge image dimensions before printing or producing any other professional images.
Changing the size of the image on Photoshop allows controlling the image appearance.
What Does Image Size Mean in Photoshop?
Before learning how to resize images in Photoshop, there is a need to learn what image size entails in Photoshop.
Image size is the dimensions and resolution of an image that is digital. These dimensions are normally expressed in terms of pixels, such as 1920 × 1080 pixels or 3000 × 2000 pixels.
More pixels mean more details contained in the image. An image that is large will have many pixels, making it possible to view more details either close up or when enlarging the image.
For instance, a highly resolved product photo may have thousands of pixels since the customers will want to see more details in the photo, but the image will be too large for the website since it will make the loading time long.
This explains why understanding image size is important.
Difference Between Image Size and Canvas Size
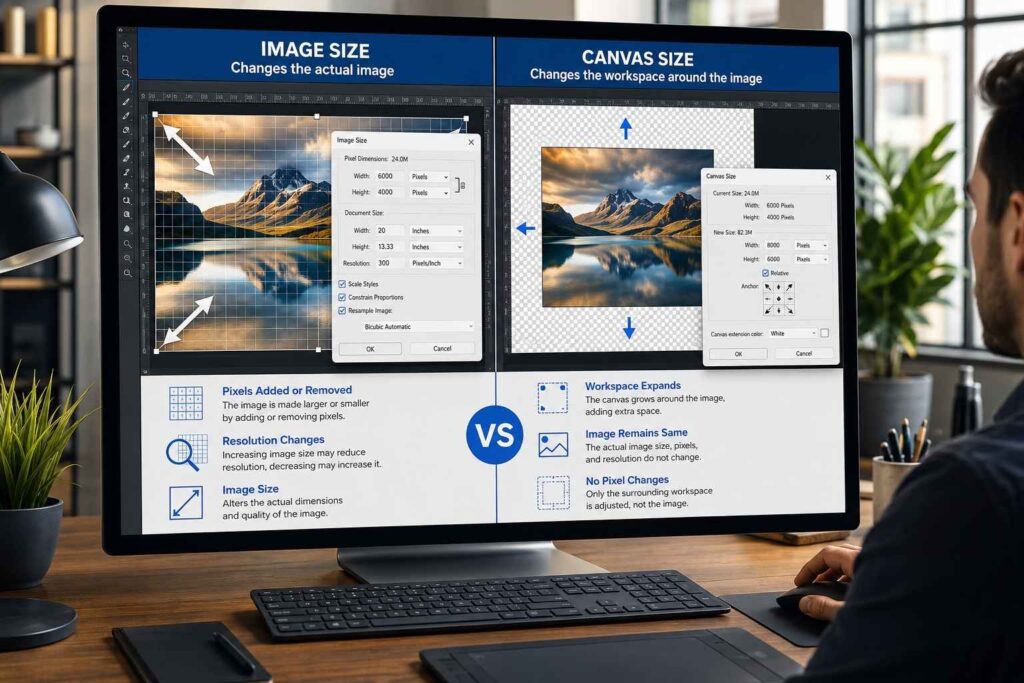
Most users of Photoshop tend to get confused between Image Size and Canvas Size options, while these are two distinct processes altogether.
Image Size will alter the real size and resolution of your image. By increasing and decreasing the image size, you will add or remove pixels from the image itself.
On the other hand, Canvas Size is used to change the workspace around your image and not to alter the pixels inside it.
For instance, if you increase the size of the canvas, you will get an extra workspace around the image without altering its real size.
Why Do You Need to Change Image Size on Photoshop?
There are various reasons that explain the need for resizing photos in Photoshop by the designers, photographers, and business organizations.
Each of the platforms has different requirements; a photograph that is fit for printing might not be fit for the web.
Preparing Images for Websites
Big images can affect the speed at which websites run. The loading of large images will make it hard for the website visitor to load the page.
You need to know how to resize images on Photoshop to be able to optimize your images.
Smaller optimized images provide:
- Faster page loading speed.
- Better user experience.
- Reduced website storage usage.
- Improved mobile performance.
However, reducing the size too much can make images appear blurry. The goal is to find the right balance between quality and file size.
Reducing Large Image Files
Modern cameras and smartphones capture very high-resolution photos. While this is useful for editing and printing, these files are often much larger than necessary for everyday use.
A large image can create problems when:
- Sending images through email.
- Uploading files to websites.
- Sharing photos online.
- Adding product images to eCommerce platforms.
Using Photoshop allows you to reduce image dimensions while keeping the important details intact.
This is why many users search for resize pic in Photoshop when they need a quick solution for large image files.
Creating Images for Social Media
Various social media sites require images to have various specifications. An image that is perfect in one site will not be correctly cropped in another.
Some examples include the images used in Instagram posts, Instagram stories, Facebook banners, and website graphics among others. If you use Photoshop in creating your images, you won’t have to rely on auto-cropping techniques. Once you learn how to resize images in Photoshop, you’ll be able to create images that are suitable for various platforms.
How to Resize Image in Photoshop
Photoshop makes resizing images simple with its built-in Image Size feature. This method allows you to adjust image dimensions, resolution, and file size according to your needs.
Step 1: Open the Image Size Option
First, open your image in Photoshop.
From the top menu:
Image → Image Size
A new window will appear showing important details about your image, including:
- Width
- Height
- Resolution
- File size
This information helps you understand the current settings before making any changes.
Step 2: Adjust Width and Height
Within the Image Size dialog box, you can specify your desired values for width and height. Prior to making any modifications, ensure that the chain link button between width and height is active. This ensures the proportions of your image remain intact.Without linking the proportions, modifying either width or height will distort your picture. For instance, if you increase width while the height remains the same, the subjects within the image might appear too wide. The proportion maintenance is one of the critical steps in resizing your image in Photoshop.
Step 3: Choose the Right Resolution
The resolution decides the quality of an image, more importantly while printing. In the case of digital environments such as the Internet and social media sites, extremely high resolutions may not be required. Photoshop offers various types of resampling techniques that influence the addition and deletion of pixels during the process of resizing. Selecting the right resampling technique ensures a higher quality image in Photoshop.
How to Resize Image in Photoshop Without Losing Quality
How to Resize Image in Photoshop Without Losing Quality
One of the most difficult things to deal with during image resizing is keeping the quality intact. People usually resize their images either up or down without knowing about the functioning of pixels in Photoshop. Consequently, the output image will appear fuzzy or unprofessional.
The objective of image resizing in Photoshop is not just about changing the dimensions but making sure that all the details remain sharp too. There are multiple ways of doing so in Photoshop.
Here are some important practices that help maintain image quality:
- Always keep a copy of the original image before resizing.
- Avoid increasing a small image to extremely large dimensions.
- Use the correct resampling option while changing image size.
- Maintain the original aspect ratio to prevent distortion.
Following these steps makes it easier to create professional-quality images for websites, social media, printing, and online platforms.
Use Smart Objects for Better Quality
Smart Objects are among the most valuable options that one can use while manipulating images in Photoshop. In this regard, they provide users with the opportunity to manipulate images in various ways without damaging the original files.
While converting an image into a Smart Object, Photoshop creates a copy of the original image and ensures that the original file remains intact. In this way, the user can manipulate the image without losing its quality.
For example, a designer may use the same product image for:
- Website banners
- Social media graphics
- Advertisements
- Marketing materials
Instead of creating multiple copies, Smart Objects allow flexible editing while preserving image quality.
How to Edit Size of Image Photoshop Using Image Size Tool
The Image Size tool is the most common method used by Photoshop users to adjust image dimensions. It provides control over width, height, resolution, and resampling settings.
To edit size of image Photoshop, follow these steps:
First, open your image in Photoshop and go to:
Image → Image Size
A dialog box will appear where you can adjust:
- Image width
- Image height
- Resolution
- Measurement units
Ensure that the “Resample” box is checked when you want Photoshop to add or subtract pixels. For example, if you want to shrink an image for a website, lower the values for width and height. Photoshop will automatically adjust the number of pixels based on your settings. Depending on what your purpose is, you may also need to adjust the resolution along with the dimensions.It is important to know where the image will be used before you make the changes.
How to Resize Pic in Photoshop Using Free Transform
Another simple method to resize a pic in Photoshop is using the Free Transform option.
This method is useful when you want to resize an image layer inside a Photoshop project.
To use Free Transform:
- Select the image layer.
- Press Ctrl + T on Windows or Command + T on Mac.
- Drag the corners to adjust the size.
- Press Enter to apply changes.
While resizing, hold the correct settings to maintain proportions. Stretching an image from one side can create unwanted distortion.
Free Transform is commonly used by designers when creating posters, advertisements, and social media graphics because it provides quick control over image placement and size.
How to Scale Picture Photoshop Without Distortion
Scaling pictures in Photoshop properly becomes crucial for designing professional designs. Scaling refers to resizing pictures while retaining their original look. The software has various scaling modes depending upon the requirement. In case of simple resizing, the Image Size mode proves quite effective. In case of designing projects using multiple layers, the Free Transform mode proves to be more flexible.While scaling pictures, one should refrain from making large-scale changes in pictures. Large-scale change in low resolution pictures will result in blurriness as there is limited information for Photoshop.
For the best results:
- Start with the highest-quality image available.
- Resize images gradually when possible.
- Keep the original file safe.
- Use Smart Objects for repeated editing.
These techniques help maintain a clean and professional appearance.
Crop Images Before Resizing in Photoshop
In some cases, the best method for optimizing the image prior to resizing involves cropping out unnecessary areas. It will help you highlight only the key elements of your picture and compose it better.
For instance, if there is too much space around a product in a picture, you may crop this area out before resizing to save the file size and make the picture more convenient for the web.
The process of cropping and resizing is usually used in tandem in professional photo editing.
More information on preparing images via cropping is available here: https://www.saivionindia.com/blog/crop-image/
After cropping unwanted sections, you can easily change image size on Photoshop while keeping the main subject clear and visually balanced.
Common Mistakes While Resizing Images in Photoshop
Even though Photoshop makes resizing easy, some common mistakes can affect image quality.
Increasing Small Images Too Much
One of the most common mistakes made by photographers is to increase the size of an image beyond its capabilities.
For instance, when one enlarges a small image for use on a poster from the Internet, one ends up with a very poor-quality image.
Ignoring Image Resolution
Most people just concentrate on width and height but never think about resolution. However, when you come to printing, resolution becomes quite important.
Remember to take into account the nature of the use of the image whether digital or physical before setting any parameters.
Not Saving the Original File
Always keep the original image before making changes. If you overwrite the original file, you may lose the ability to create different versions later.
Professional designers usually keep original files and export resized copies for different purposes.
Photoshop Tips for Better Image Resizing Results
Photoshop provides many tools, but using them correctly makes the biggest difference.
Some useful tips include:
- Use “Bicubic Sharper” when reducing image size.
- Use “Preserve Details” when increasing image dimensions.
- Check the image at 100% zoom after resizing.
- Save images in the correct format according to usage.
- Avoid repeated resizing of the same file.
For websites, saving optimized JPEG or WebP files can improve loading speed. For professional printing, keeping higher resolution settings is usually recommended.
Best Photoshop Settings for Different Image Uses
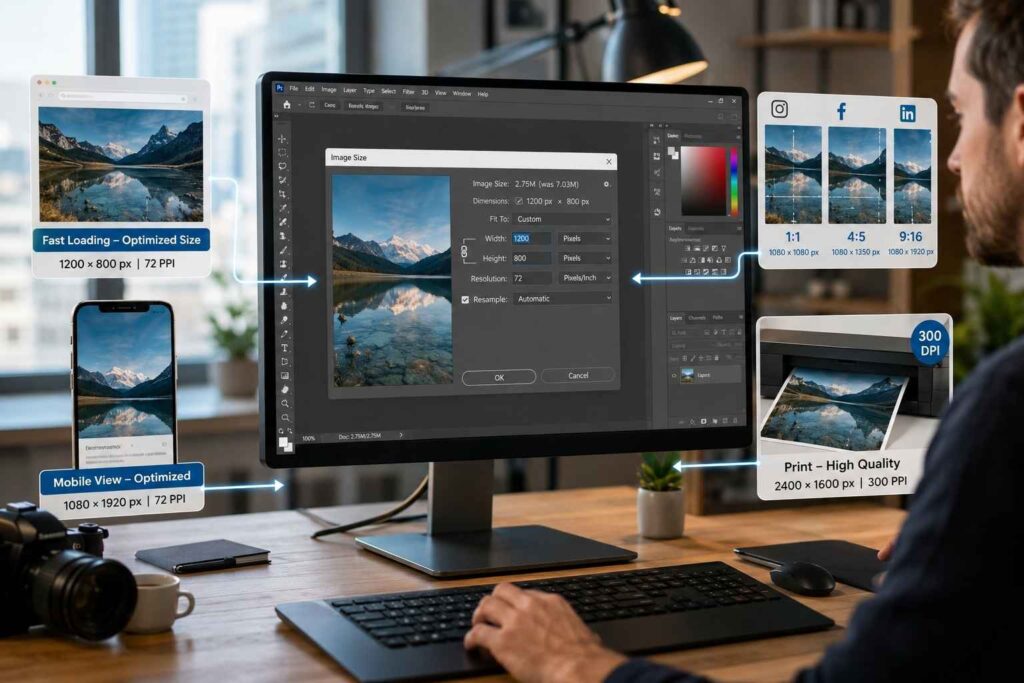
The choice of the suitable settings when resizing images largely depends on the application where the images will be used. The same image may require different sizes for use on websites, blogs, social media platforms, and even for print purposes.
Always take into consideration the intended use of the image whenever resizing images using Photoshop. An oversized image may serve its purpose very well in print format and not necessarily online.
Images used for websites and blogs tend to be smaller to improve the browsing experience. Oversized images may be a source of slower page loading and reduced user engagement.
Images for social media platforms must meet the required dimension criteria to avoid cropping which can negatively impact the professionalism of the content.
Printed images must have higher resolution as printers require more details in images for good results. Here, image quality takes priority over image size.
This information is helpful when resizing images in Photoshop.
Conclusion
Knowing how to resize pictures in Photoshop correctly is one of the vital skills for any photographer, designer, marketer or businessman. No matter what kind of photo you need to edit for products, for your site or social media – you should understand resizing techniques for obtaining the professional result.
There are various ways to manage image dimensions in Photoshop and create perfect pictures with the necessary proportions. Tools such as Image Size, Free Transform and Smart Objects will be helpful in this case.
No matter whether you would like to change image size in Photoshop, edit size of image in Photoshop, resize image in Photoshop, resize picture in Photoshop, or scale picture in Photoshop, there are various methods depending on your requirements.
Keep in mind that the process of resizing is not only reducing or enlarging. You should create proper harmony between quality, dimensions and performance.
TAGS
